Picture in Picture Cheat Sheet (iOS)

TL;DR

Here you can find a simple PiP implementation. Clone and run it, and then check the following components:

  1. PictureInPicture.swift (component that encapsulates the AVPictureInPictureController)
  2. MovieView.swift (contains the pip button, with calls to start or stop PiP)
  3. MoviesCatalogView.swift (contains the PiP restoration logic)

What it is

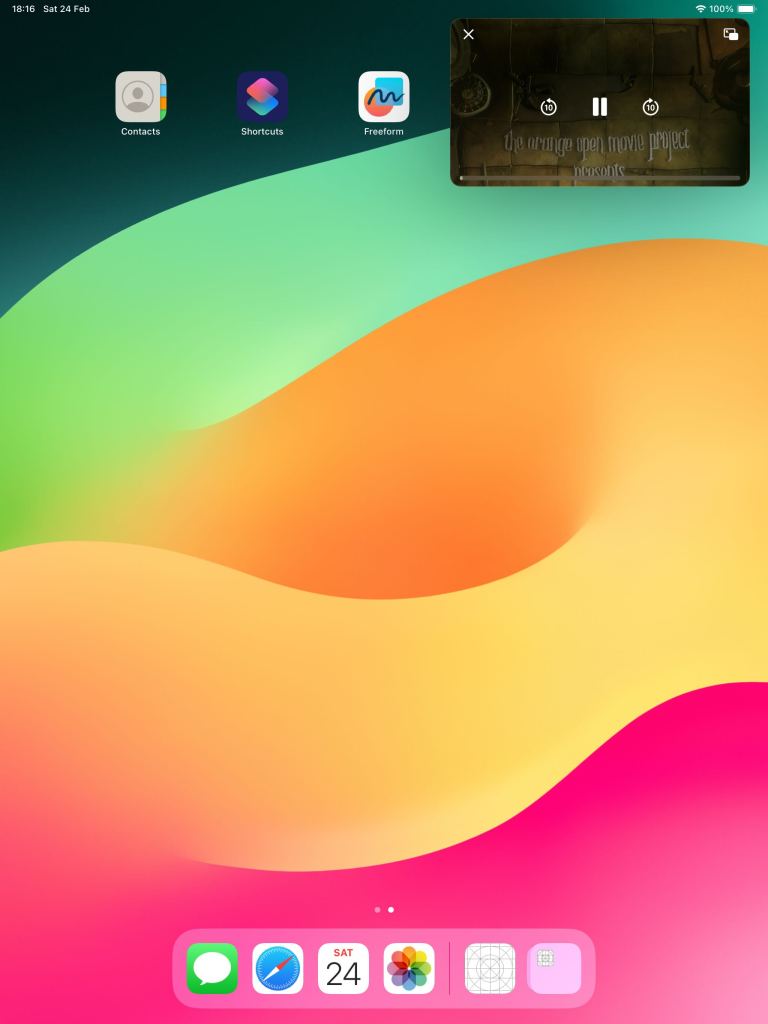
When users watch videos, PiP allows them to continue playback while navigating in other areas of the application or iOS itself. It does so by “moving” the playback to a floating window controlled by the OS.

Picture in Picture in action

Initialization

To control pip, one must interface with AVPictureInPictureController, a class belonging to the AVKit framework. Initialization usually happens in this order:

  1. You’ll need an AVPlayer instance
  2. Create an AVPlayerLayer configured with your player instance
  3. Check if the current device supports pip: AVPictureInPictureController.isPictureInPictureSupported()
  4. Create an instance of the pip controller: AVPictureInPictureController(playerLayer: yourLayer)
  5. Check if the controller can start pip (this step is asynchronous) using controller.publisher(for: \.isPictureInPicturePossible)
import AVKit

// ...

guard AVPictureInPictureController.isPictureInPictureSupported() else {
    return
}

let pipController = AVPictureInPictureController(playerLayer: myLayer)
pipController.delegate = self

pipController
    .publisher(for: \.isPictureInPicturePossible)
    .sink { ... }
    .store(in: ...)

Start/stop

pipController.startPictureInPicture()
pipController.stopPictureInPicture()

It’s possible to automatically start it as soon as the app enters background:

pipController.canStartPictureInPictureAutomaticallyFromInline = true

Reacting to pip state

Pip uses the classical delegation mechanism to inform when its state changes, as well as if it couldn’t launch because of an error:

pipController.delegate = yourConformingInstance
// ...
extension SomeComponent: AVPictureInPictureControllerDelegate {
        func pictureInPictureControllerDidStartPictureInPicture(_ pictureInPictureController: AVPictureInPictureController) {
        // TODO: deal with any changes to state
    }
    
    func pictureInPictureControllerDidStopPictureInPicture(_ pictureInPictureController: AVPictureInPictureController) {
        // TODO: deal with any changes to state
    }
    
    func pictureInPictureController(_ pictureInPictureController: AVPictureInPictureController, failedToStartPictureInPictureWithError error: Error) {
        // TODO: deal with any errors
    }
}

Restoring playback UI

Users might return to the original playback context in your app. The delegate has a specific method for that, in two flavors:

Closure based approach

func pictureInPictureController(_ pictureInPictureController: AVPictureInPictureController, restoreUserInterfaceForPictureInPictureStopWithCompletionHandler completionHandler: @escaping (Bool) -> Void) {
    // TODO: Restore your UI
    // Invoke the closure with a flag indicating if the UI could be restored or not
}

Async function

func pictureInPictureController(_ pictureInPictureController: AVPictureInPictureController) async -> Bool {
    // TODO: await for UI restoration
    // TODO: Return flag indicating if UI was restored or not
}

Notes:

  1. When restoring your UI, make sure the frame of your player view stays consistent and doesn’t change, otherwise PIP animation will get buggy and animate to the wrong position.
  2. Playback restoration will require some effort depending on how your app is architected and what stack it uses (SwiftUI vs. UIKit, for example). For a simple example on how this could be accomplished, check this implementation repository.

Limitations

  1. Lack of customization in the controls (we can’t change how they look)
  2. We can hide specific controls using the requiresLinearPlayback property of the pipController
  3. This repository contains some ways of changing it (bear in mind some of these approaches are not documented by Apple)
  4. Finally, only iPad simulators support PiP

SwiftUI Tip: Enumerating a View State

Due to its declarative and reactive nature, SwiftUI works pretty well with this technique. Suppose we are building a screen that fetches a Github profile. We begin by describing the possible stages of this fetch process:

enum State: Equatable {
    case `default`
    case loading
    case fetched(profile: GithubProfileViewModel)
    case failure(error: HttpError)
}

In the view model, we declare a variable holding the state:

@MainActor
final class GithubProfileFetchViewModel: ObservableObject {

    @Published
    private(set) var state = State.default

    func fetchProfile(using username: String) async {
        // This method will update the state in the different stages
        // of the fetch process. Notice the state is published.
    }

    // ...
}

Then in the View, we use this state when declaring our body:

struct GithubProfileFetchView: View {

    @StateObject
    private var viewModel = GithubProfileFetchViewModel()

    // ...

    var body: some View {
        VStack {
            // ...
            
            switch viewModel.state {
            case .`default`:
                DefaultProfileView()
                
            case .fetched(let profileViewModel):
                ScrollView {
                    GithubProfileView(viewModel: profileViewModel)
                        .padding()
                }
                
            case .loading:
                LoadingIndicator()
                
            case .failure(let error):
                if error == .requestFailed(statusCode: 404) {
                    ErrorView.profileNotFound()
                } else {
                    ErrorView.connectionError()
                }
            }

            // ...
        }
        .task(id: shouldStartFetch) {
            await fetchProfile()
        }
    }
    // ...
}

The usage of switch makes the code really readable. Whenever the state changes, SwiftUI presents a different view for us. Since SwiftUI is declarative, we don’t need to setup bindings, and manually change what we display. This process is all done automatically for us.

Note that this technique works with other architectures too, and with other property wrappers (e.g @State, @ObservableObject, @EnvironmentObject). You can check the full view model or view code.

You might also want to read this article by Apple.

When does a SwiftUI Environment get retained?

The answer depends on how we use SwiftUI. For an app entirely written using it, one might argue that it gets released whenever the app finishes. But what about an UIKit app that uses some SwiftUI views?

To answer this question, let’s explore some scenarios involving environment objects. They have reference semantics, and we can track their instances using the memory graph.

If you wish to check the sample project, here’s the repository. It has different git tags for each scenario explored below.

Scenario 1: holding a View instance

Let’s begin our exploration by instantiating our RootView with some environment objects. We won’t attach it to the UI, but only store it in a variable in our view controller:

class MainViewController: UIViewController {
    var rootView: AnyView!
    
    override func viewDidLoad() {
        super.viewDidLoad()
        
        rootView = AnyView(
            RootView()
                .environmentObject(EnvA())
                .environmentObject(EnvB())
        )
    }
}

SwiftUI needs a way to bind these environment objects to a specific view. They will stay around as long as we hold the RootView instance. If we build the memory graph, here’s what it shows:

Scenario 1: holding a RootView instance.

Notice the memory graph doesn’t show instances of SwiftUI views. These are structs, and have value semantics, not living in the heap.

Scenario 2: Holding a reference to a UIHostingController instance

This is similar to the first scenario. If we hold a reference to a UIHostingController, the environment will still be around, as the controller holds the value of its root view. Notice this happens even after the SwiftUI views get removed from the view hierarchy:

@objc private func releaseRootView() {
    guard let rootViewHostingController,
          let hostingView = rootViewHostingController.view else {
        return
    }
        
    rootViewHostingController.removeFromParent()
    hostingView.removeFromSuperview()
        
    // Scenario 2: Keep holding a reference to the hosting controller.
    //self.rootViewHostingController = nil
}

The memory graph continues showing our two instances in memory:

Scenario 2: Referencing a UIHostingController

Scenario 3: Having a UIView with a retain cycle

In this scenario, we explore UIViews used within a SwiftUI view tree. UIViews have reference semantics, and if an instance leaks in memory, the SwiftUI environment will continue alive:

final class LeakingUIView: UIView {
    private var retainingClosure: (() -> ())!
    
    override func layoutSubviews() {
        super.layoutSubviews()
        
        retainingClosure = {
            // Scenario 3: Having a retain cycle in a UIView.
            self.backgroundColor = .red
        }
        retainingClosure()
    }
}

struct LeakingView: UIViewRepresentable {
    func makeUIView(context: Context) -> LeakingUIView {
        LeakingUIView()
    }
    
    func updateUIView(_ uiView: LeakingUIView, context: Context) {}
}

When we release our hosting controller instance, we notice the environment is still being held due to references associated with the leaking view in memory.

Here’s what the memory graph shows:

  1. LeakingView has a reference a UITraitCollection
  2. UITraitCollection has a reference to a SwiftUIEnvironmentWrapper
  3. SwiftUIEnvironmentWrapper has references to its environment objects (EnvA, EnvB)

Scenario 4: Having a retain cycle between a UIView and an environment object

If we hold a reference to a UIView in one of the environment objects, and this UIView was inside a SwiftUI tree, we have a reference cycle:

struct SubView: UIViewRepresentable {
    @EnvironmentObject
    private var envA: EnvA
    
    func makeUIView(context: Context) -> SubUIView {
        let subView = SubUIView()
        // Scenario 4: Retain cycle between environemnt objects and view references.
        envA.someView = subView
        return subView
    }
    
    func updateUIView(_ uiView: SubUIView, context: Context) {}
}

After removing the SwiftUI views from the screen, here’s what the memory graph shows:

Scenario 4: a retain cycle between SubUIView and EnvA
  1. SubUIView has a reference to a UITraitCollection
  2. UITraitCollection has a reference to a SwiftUIEnvironmentWrapper
  3. SwiftUIEnvironmentWrapper has a reference to EnvA
  4. EnvA has a reference to SubUIView, and we can go back to the point 1 (a cycle)

Conclusion

Always make sure to:

  1. Dispose of any SwiftUI View values not used anymore
  2. Dispose of any UIHostingController references not used anymore
  3. Watch out for memory leaks in:
    • UIViews used within SwiftUI
    • references between your UIViews and your environment objects
    • UIViewControllers presenting the UIHostingControllers
    • the environment objects themselves

Environment objects can get complex depending on what your views need to accomplish. They might use a lot of computational resources, so it’s necessary to watch out for live instances when the underlying views get deallocated.